


In this article, I’m going to show you something a bit different; how to 3D print lithophane. However, not just any old lithophane. No, I’m going to show you how to 3D print lithophane Anime prints!
At Geeky.inc we’re devoted to bringing you all the best Anime, 3D printing and gaming inspiration you’ll need. So, what better than to combine two of those topics and create an awesome 3D printed lithophane of your favorite Anime character.
First though, you might be wondering what a lithophane actually is. Well, the world of 3D printing may be relatively new in terms of technology but lithophanes have been around for centuries. Let’s take a brief dive back in time to see where they came from.
What is a Lithophane?
The word lithophane is a combination of the French words litho, meaning stone, and diaphane, which means being of ethereal or transparent quality. Examples of early lithophanes were known to be in existence in 11th-century China but they became extremely popular in 1820s Europe. The original method of production involved carving or even stamping designs or images into translucent porcelain.
Of course, we now have 3D printers which have made the whole process a lot easier and lithophanes are becoming a lot more detailed.
How to 3D Print a Lithophane
OK, we’ve covered the history part so let’s know look at the future. That future involves you hopefully following this guide and then owning a 3D printed lithophane of an Anime character.
But which character would you choose? There are so many iconic characters in the world of Anime as my other article "Printing Anime History: 3D Models of Iconic Characters" has shown. You could of course decide to 3D print a lithophane of any of these or one that you like that didn’t make our list. However, I’m going to show you how to 3D print a lithophane of Saitama, also known as One Punch Man. The reason I’ve chosen him is not just because I’m a fan, but he’s also fairly simply drawn. Now, that might not be too exciting if you’re looking for a highly detailed lithophane, but if this is your first attempt, Saitama and his simple looks are a good starting point.
So, let’s go through the stages of how to 3D print a lithophane in my step-by-step guide.
Step1: Choose your image
As I said, Saitama is fairly simply drawn in the original Manga but there are some more detailed and colorful images out there which might catch your eye. The important word here though is color. Lithophanes need to be printed in a single color to work properly and it’s the different depths, thicknesses and contrasts of the image that let light through to show the full picture. Colour therefore isn’t important as the final image is displayed in shades of grey, much like an old sepia toned picture.
With that in mind, by all means go for an image you like but at this stage, keep it fairly simple and fairly low in detail. High detail with intricate and small aspects probably won’t show up as a lithophane so bear this in mind.
The good news though is that we’re not going to use a photographic image of Saitama for our lithophane so the detail won’t necessarily be there anyway.
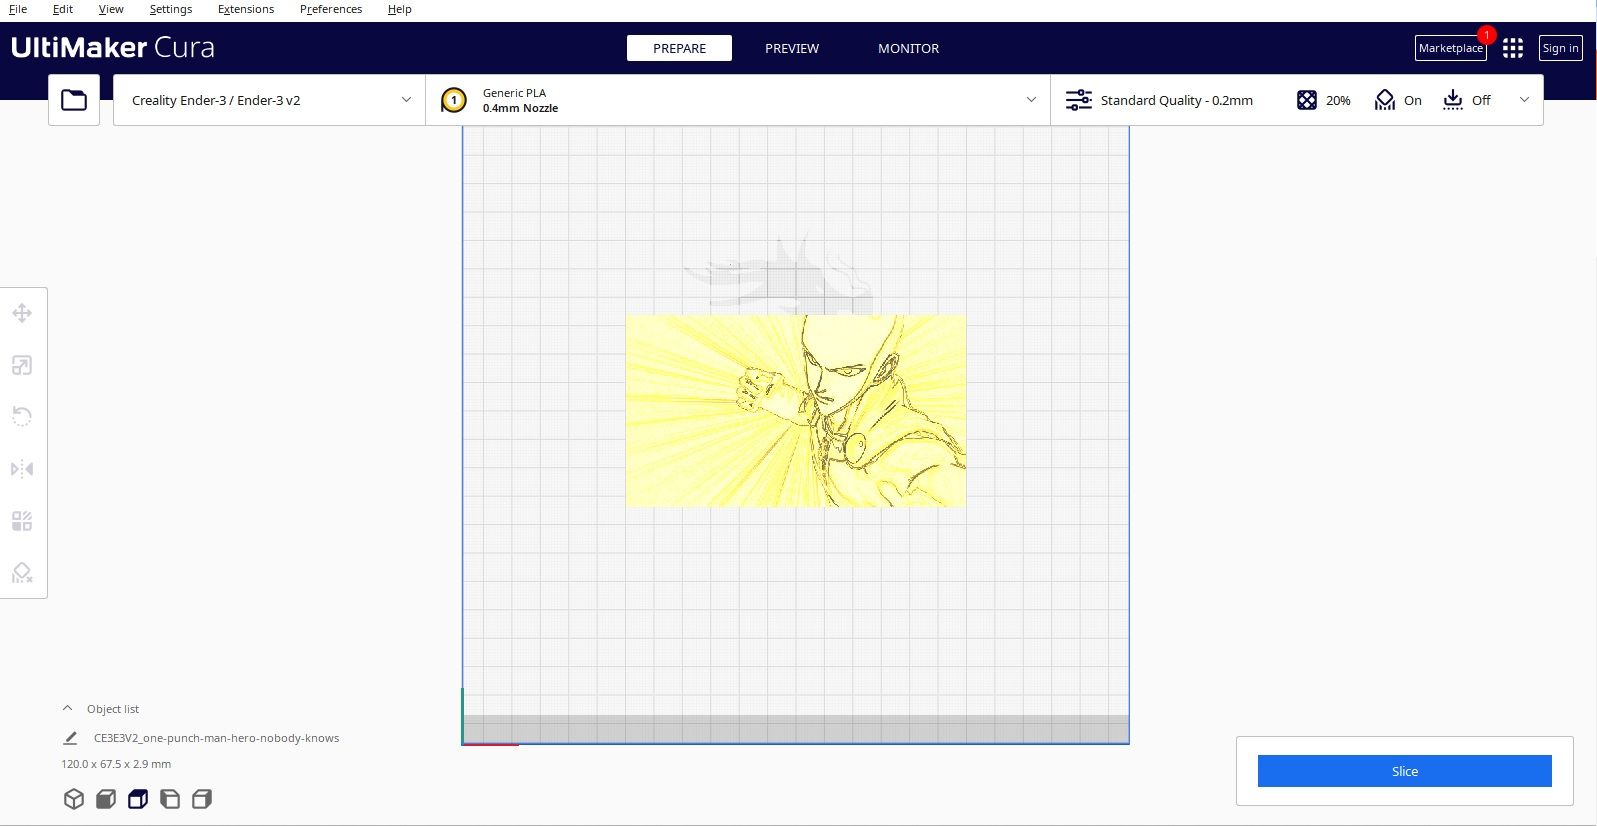
For my example, I’ve chosen this image of Saitama which I think will look great when turned into a lithophane.
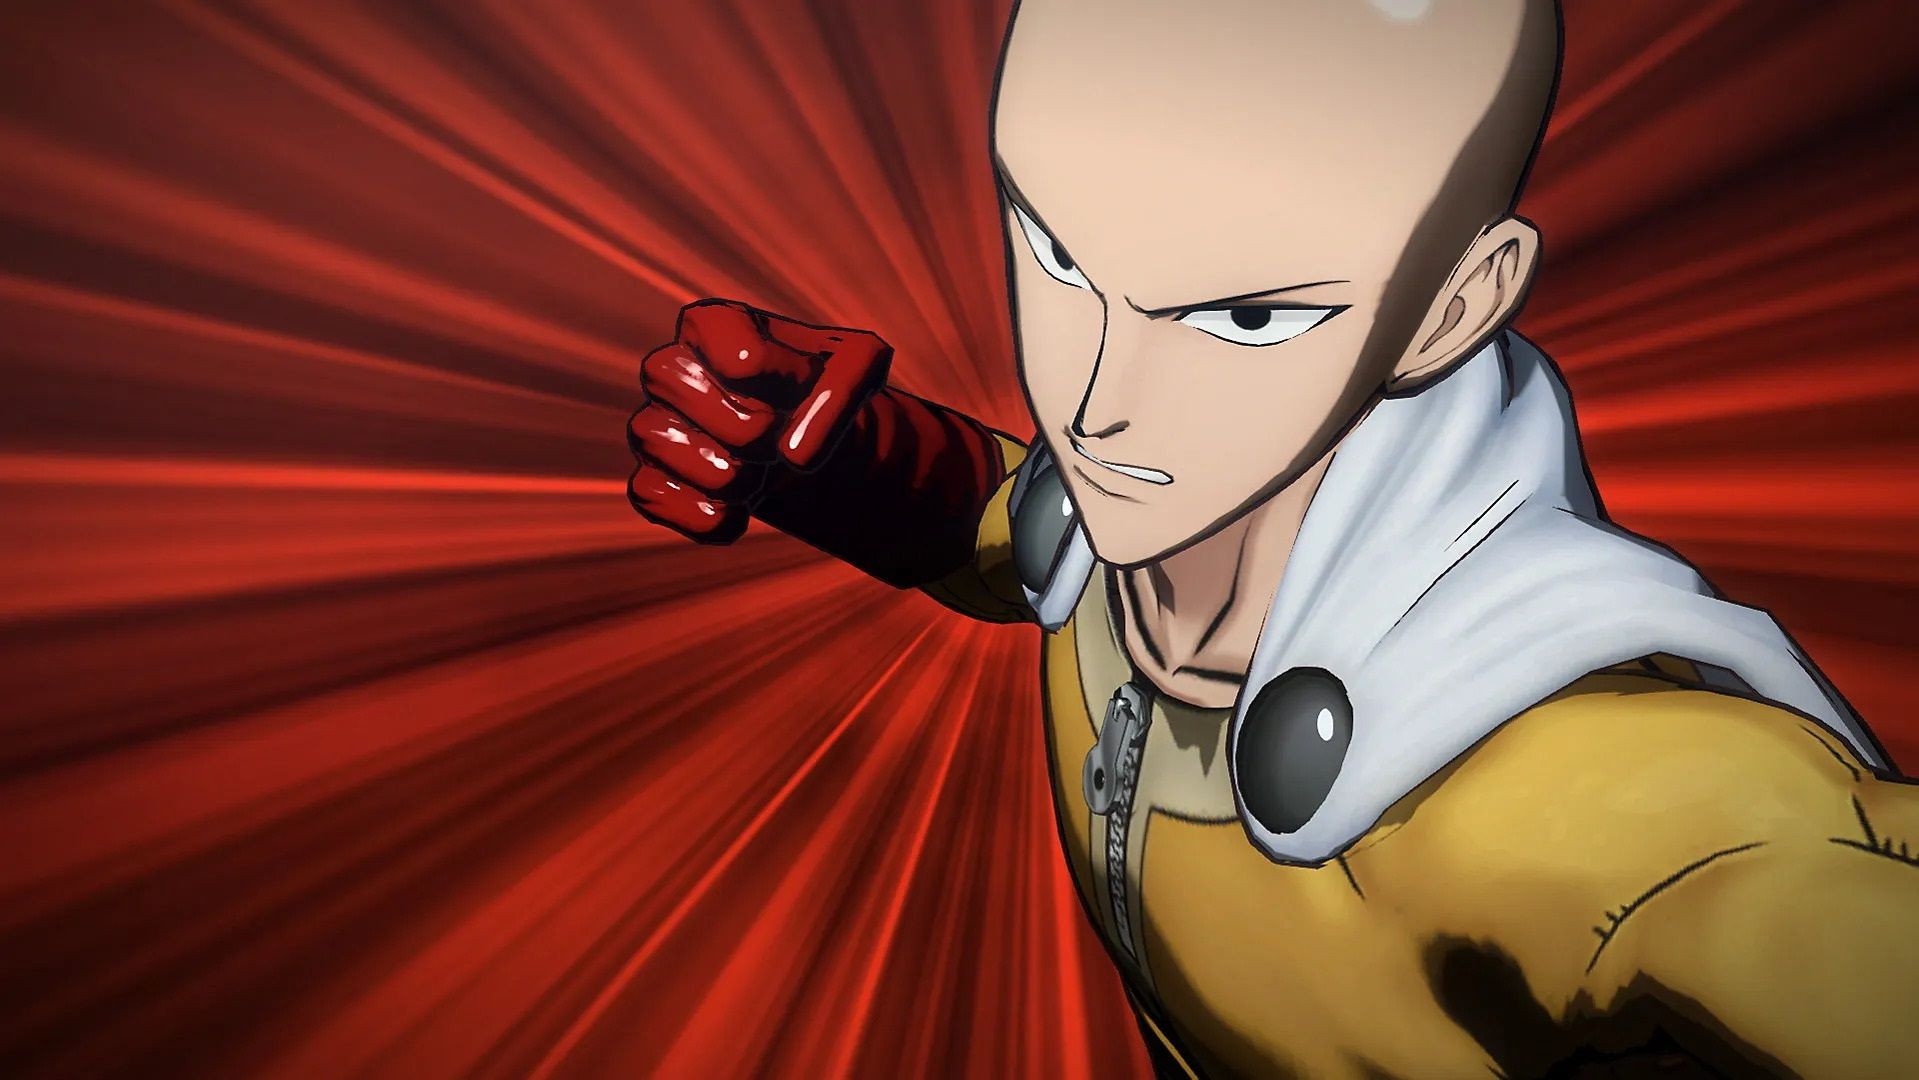
You’ll see that there are a few good areas of contrast between colours which, when printed, will be defined as thicker or raised areas of the lithophane. The image of Saitama drawing his fist back to deliver his punch will also give a great 3D effect with the lines emanating from his elbow.
Step 2: Preparing the image for printing
So we have our chosen image but we now need to convert it so that it will print as a lithophane. Now, there are several ways you can do this and a lot of other guides will tell you to use an application to convert your image. I could of course do that but I want to show you a fairly simple way to produce a lithophane without bypassing the conversion process. It’s always much better to produce your own work rather than use a program that someone else has produced to do it.
That being said, there is of course no way to avoid using software to prepare your lithophane as you’re using a digital image. However, the software program I’m going to use for my lithophane is one that, as a 3D printing enthusiast, you should already be familiar with. I am of course referring to Cura.
As you probably know, Cura is a slicing program that allows you to prepare and manipulate your files before you 3D print them. Ordinarily you’d be working with g-code or STL files but in this case we’re going to use a standard JPEG file.
Step 3: Processing the image in Cura
Hopefully, you’ll already have Cura loaded on your PC but if not it’s free to download here and there are no future costs or subscriptions.
Once you’ve installed Cura, open it up and you’ll be presented with a virtual representation of your printer’s build volume. I won’t go through how to set up Cura but the basics you need to get started are fairly straightforward.
Let’s now dive into how to upload the image and how to prepare it for printing as a lithophane.
A. Load the image file: Select “file” from the top dropdown menu and then “Open files”. This will then allow you to select your image that you’ve hopefully saved where you can find it!
B. Convert the image: The image as a JPEG file needs to be converted to a usable 3D file so when you load the image, this pop-up menu will appear:
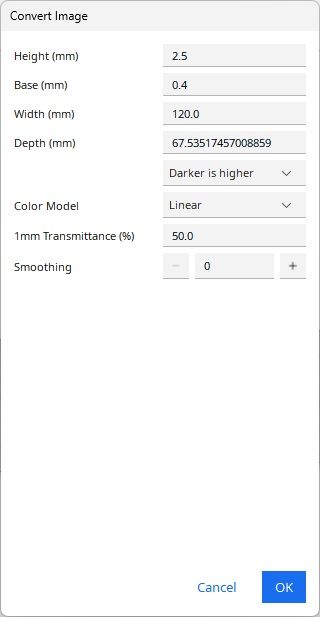
The settings you’ll see refer to how the 3D lithophane will be printed once converted. The “Height” setting refers to the maximum thickness of the darker parts of the lithophane image. So, where there is shading or darker “color”, the lithophane will print in comparison to that area but up to the maximum height you set. The default is 2.5mm which is fine so no need to change that.
The “Base” setting is the opposite so it will reduce the lighter areas of the lithophane in comparison to their tone but no lower than 0.4mm. This is also important to note if you decide to print your lithophane in a vertical position with a standard 0.4mm nozzle as that will need to be the minimum setting anyway.
The “Width” is the well, width of the lithophane and is set as default to 120mm. I’ve left it at that for the purposes of this exercise. The “Depth” is in fact what you might usually refer to as the height but obviously we can’t have two of those. You’ll see from the image that the depth is a very specific measurement but this is determined by the aspect ratio of the original picture. Therefore, if you change the width the depth will change to match.
The next two settings don’t need changing at all but for the “Smoothing”, make sure to set this to zero. Any smoothing may cause the image to blur in places which you obviously don’t want.
Click “OK” and in a few seconds the image will be loaded onto the virtual plane as shown in the images below:
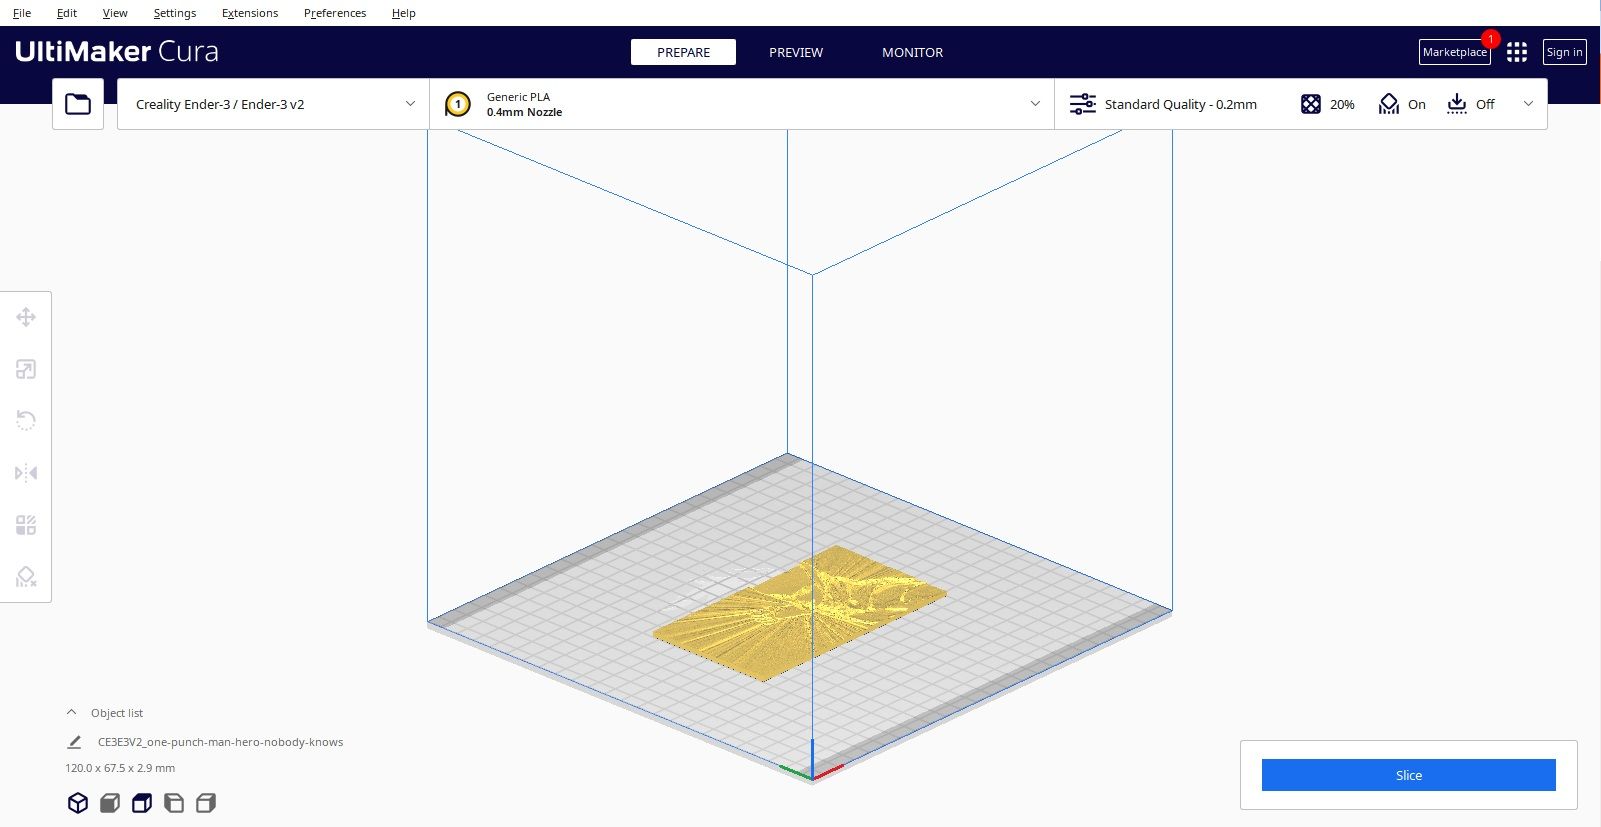
You’ll see in the right-hand bottom corner the button “Slice” which is our ultimate goal but there are a couple of further steps to take care of first.
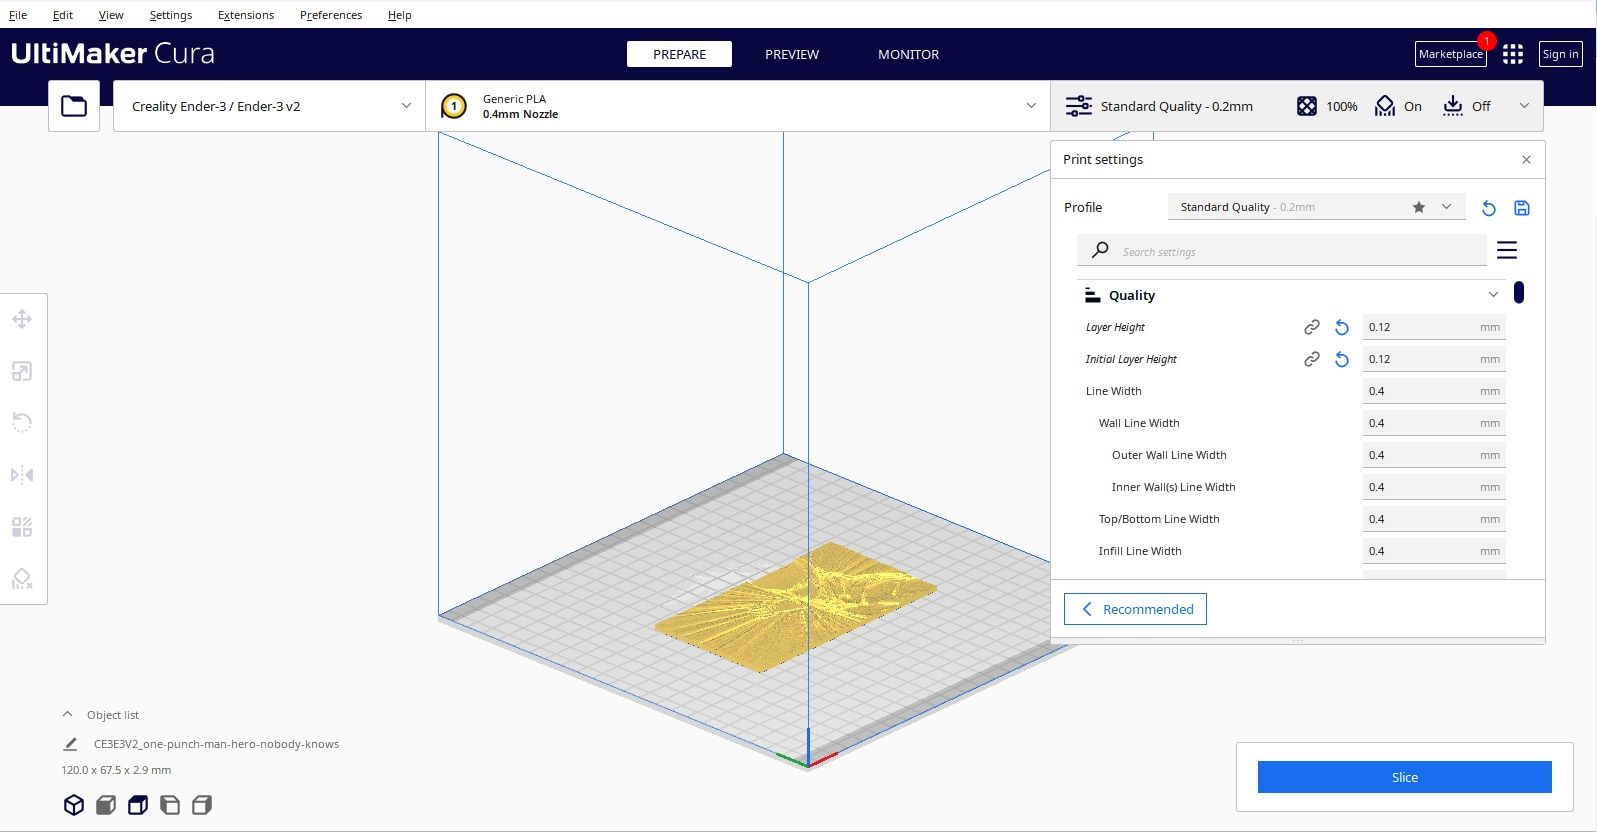
C. Set the infill: Infill is an important part of most 3D models that you’ll print as it determines the strength and density of the model. With a lithophane though, you need to set the infill to 100% as you don’t want to see any of the usual grid lines you’ll get with a 10 or 20% infill that you might usually have. To do this, open the dropdown menu at the top right of the screen and scroll down to “Infill”. Change the setting to 100% and you’re done.
D. Set the layer height: The layer height will determine the overall quality of your lithophane so it’s best to set this a bit lower than that which you may be used to. A layer height of at least 0.1mm is always my recommendation but in this case I set the layer height to 1.2mm. This can be done in the same dropdown as for the infill but select “Quality” to do so.
E. Set the print speed: You may be used to having a fairly fast print speed and there is sometimes competition between printing enthusiasts to brag about their “super-fast printer”. Not to sound too dramatic here but speed kills when it comes to lithophanes. So, try lowering the speed to at least 30mm/s or even 20mm/s if you’re not too worried how long it takes. Obviously a lower print speed will mean a longer print time but having the quality and a successful print is more important. Again, this can be done in the right-hand dropdown menu.
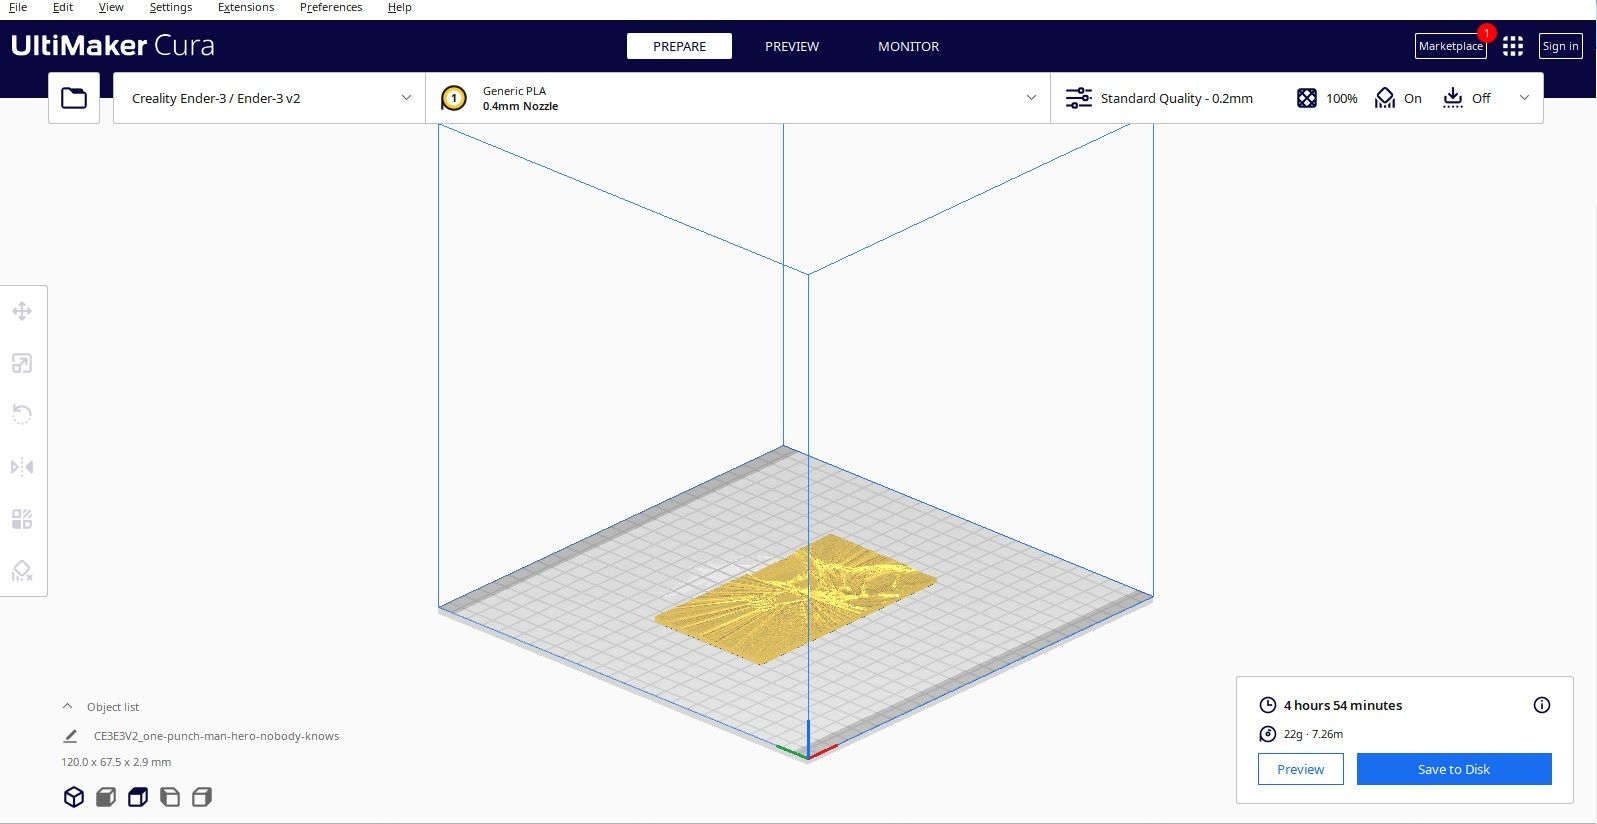
F. Slice!: Once you’ve set all the parameters you need to as I explained, you’re ready to slice the model. If you’re not sure what I mean, slicing is basically the process of taking all your settings and turning this and the image into a 3D printable file. Once you’ve done this you’ll see an estimated print time and filament usage figure but don’t take that as verbatim. The printer you’ve set up as your profile will have bearing on this figure and for reference, I’m using a Creality Ender 3 V2 Neo for my print. Based on the Cura estimate, the lithophane will take 4 hours and 54 minutes.
Make sure to save your sliced file to your PC or an SD card and your done with that part.
Step 4: Print the Lithophane
OK, so I’ve shown you how to convert and prepare a 2D image so it can be printed as a 3D lithophane. Not as difficult as you thought, right? But now comes the part that will make or break the hard work you’ve put into prepping your image, the printing.
Whichever printer you’re using will depend on how you transfer the saved file to it but with my Ender, it’s either a case of using the file from an SD card or uploading it to the Creality Cloud app and remote printing from there. I won’t go into the detail of how exactly to do this as you might well be using a different branded printer but this is the method I use.
Once you’ve got the file loaded and ready to go you may want to consider which orientation you want to print the lithophane at. In our example, the lithophane was laid flat so that it prints in that position. This can however lead to poorer quality as we’re dealing with very few layers which will sometimes then “squish” together. This could cause the lithophane to become less defined as a result.
The other option is to print it in the vertical position the Y axis. This will give you more definition of the image as the Y axis moves from front to back while the Z axis moves from left to right. This will help reduce vibration and potential layer shifting. The only downside of vertical printed lithophanes in my opinion is that they can become unstable anyway as the print progresses upwards. My suggestion is to try each orientation and see which gives you the best results.
Step 5: There is no step 5!
Once you’ve successfully printed your lithophane you’re all done! However, I do have a couple of printing tips for you that may sound obvious but can be overlooked.
Printing Tips
Tip 1
Use a light-colored filament. This might sound obvious but you’d be surprised how many black lithophanes I’ve seen! Obviously. For the effect of the lithophane to work, it needs to be able to allow light through. Using a black or overly dark colored filament will therefore not let light through and is just a nice 3D printed plaque rather than a lithophane.
Therefore choose a much lighter and light permeable color. White would be the obvious choice but I have also made lithophanes with yellow and orange filaments.
Tip 2
Avoid draughts. Make sure that the room or area that your printer is situated isn’t right by an open window or next to a door that is constantly opening and closing. A draught or gust or air can cool both the print bed and the printed lithophane as its made and will cause it to warp. This will basically make your lithophane unusable. So avoid draughts and avoid warping. If you can, either invest in or construct your own enclosure for your printer and the problem of draughts will be solved.
And Finally…
So there we have it, I’ve shown you how to design and 3D print a lithophane of your favorite Anime character.
As I said earlier, there are other ways to produce the lithophane and various software applications that will do the work for you. I didn’t want though to just give you a list and links to other sights to take your lithophane making project further. I wanted to, and have hopefully succeeded, in keeping all the information you need in one place and easy to follow.
Lights off, Lights on
One more thing….
Did you think I was going to leave you hanging and not show you the final result? I wouldn’t be so mean!
So, first of all we have the lithophane as it came off the printer and with no light source behind it.
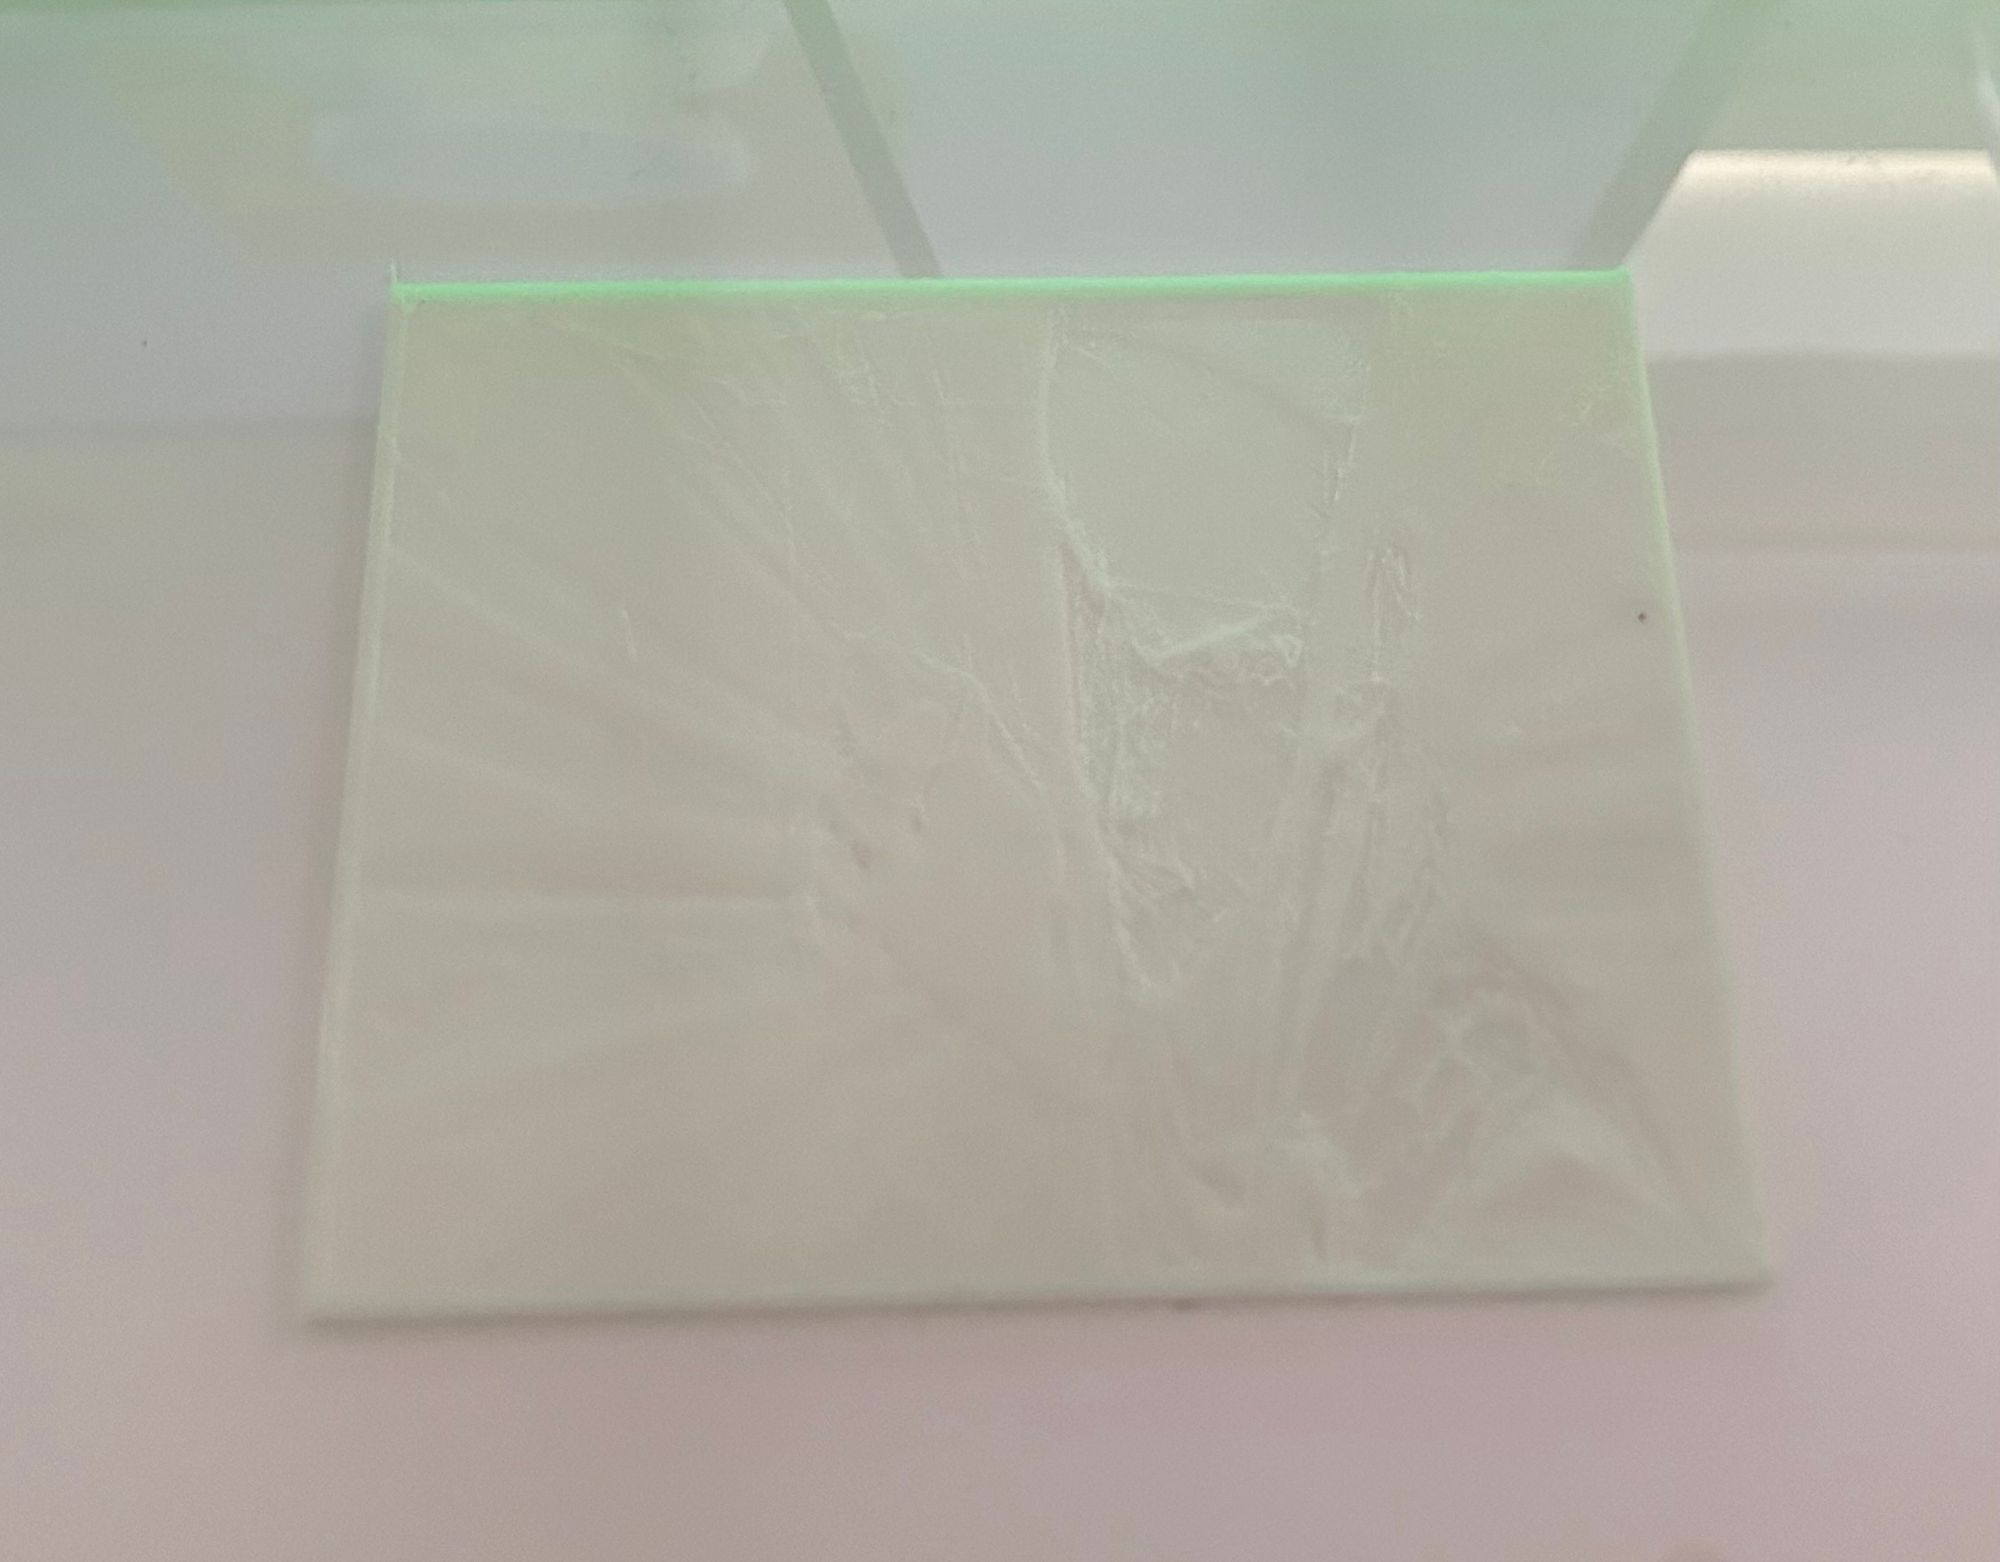
You can kind of see the detail anyway but not in its full glory. As a note, I had to bring in the image borders slightly to get more of a close-up view.
Now let’s see the completed lithophane with a light source added behind it.
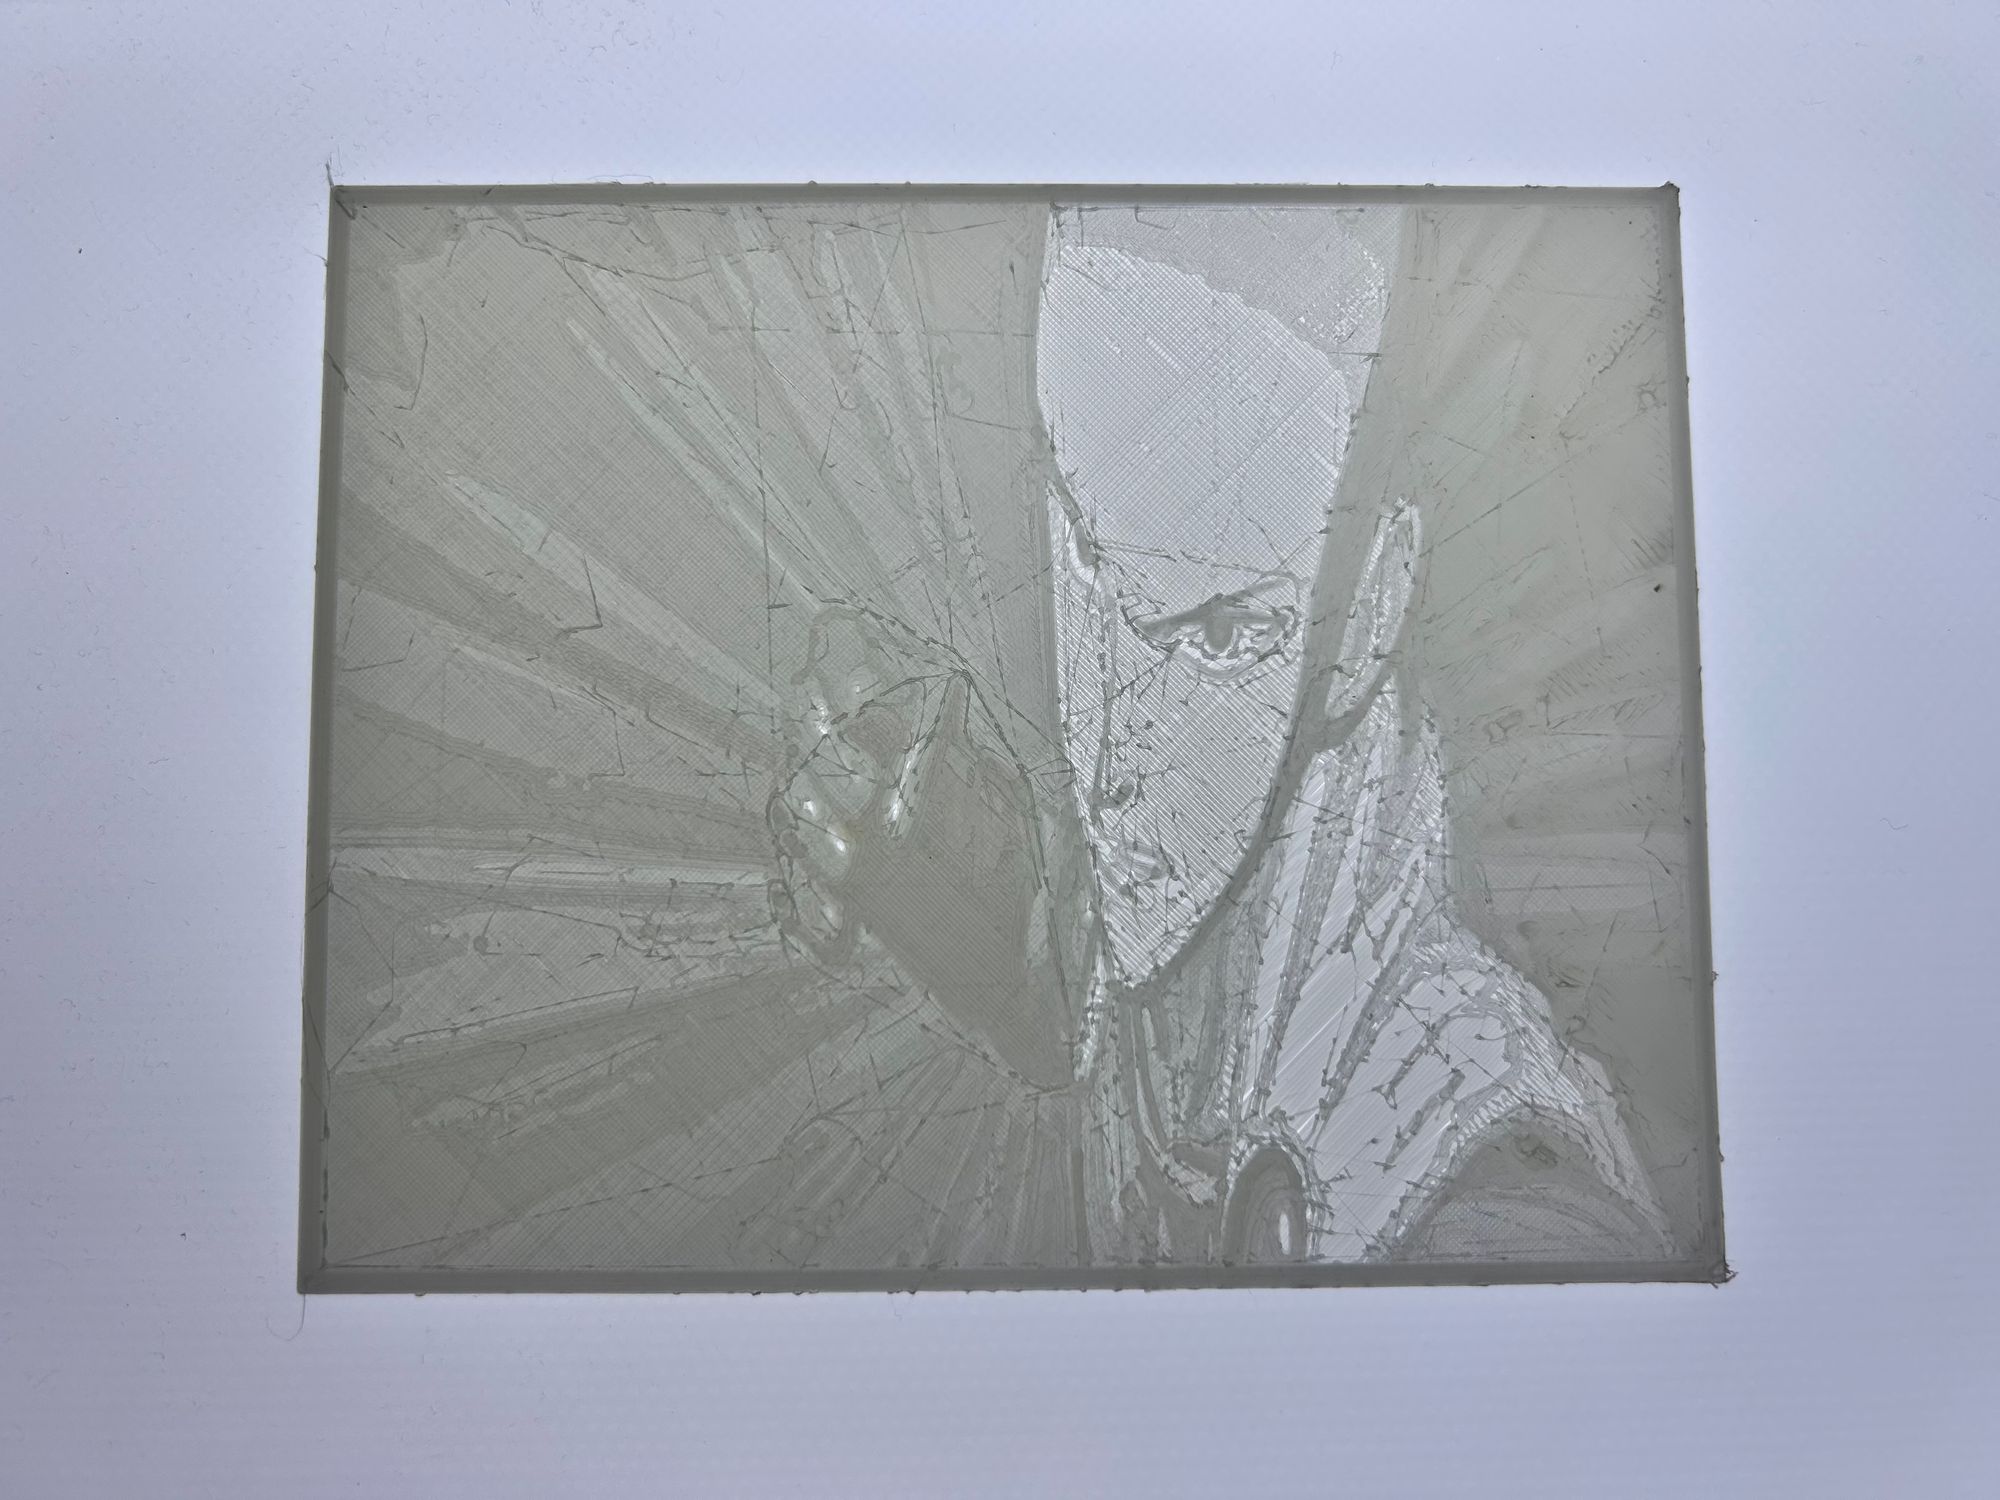
You can now see the detail and the full effect of the different heights of layers that were adjusted in the settings. You’ll note that there are some little “spiderweb” lines on the lighter parts and this is due to the extraction and some residue left behind as the nozzle moves over the lower parts. I left these in place for this image to show you what to expect but you’ll need to remove these carefully to complete the finished lithophane.
I hope you like it and enjoy trying it out for yourself.
Wave 1 — Kitsune Legends Vol. 1
Wave 1 is live.
Four hand-printed fox-spirits. One sealed box. You don't choose your kitsune — you summon it. Limited run, no restock.
Summon your Kitsune on Etsy →


Member discussion