


I’ve looked previously at how you can get started in 3D printing and what you need, the sort of things you can 3D print and some ideas for RPG and game night related 3D printed items. I’ve also shown you some ideas for prints of iconic Anime characters and some other characters and prints from the darker side of Anime.
All of these have been fairly easy to 3D print, with a few exceptions, but would still maybe test some of your 3D printing skills and knowledge to produce a good result.
In this article though, I’m going to show you some more detailed, intricate and maybe even complicated 3D printing ideas which will hopefully challenge you but also help boost and build your ever-increasing knowledge of the 3D printing world. I’ll guide you through some tips and skills you can use to improve the quality and intricacy of your prints and hopefully make things easier and less stressful for you.
Of course, at Geeky Inc., we’re focused on three core subjects: Anime, 3D printing and gaming. So, I’ll obviously again be looking at models and 3D printing projects based around these genres.
Let’s get started then and have a look at some example projects that you could try in the world of gaming.
I’ve looked before at gaming in terms of video games and how 3D printing can be used to prototype game characters and also related merchandise. For this article though, I’m going to concentrate more on the physical side of gaming which includes board games, RPGs and other tabletop games.
Have a look at my other articles, “Revolutionize Your Game Night with 3D Printing” and “3D Printed RPG Accessories: Enhance Your Gaming Experience” to get some ideas on what I’ve covered previously on the subject.
For this article though, I’m first going to look at game scenery and buildings for RPGs and tabletop gaming.
Tabletop Gaming Buildings and Terrain
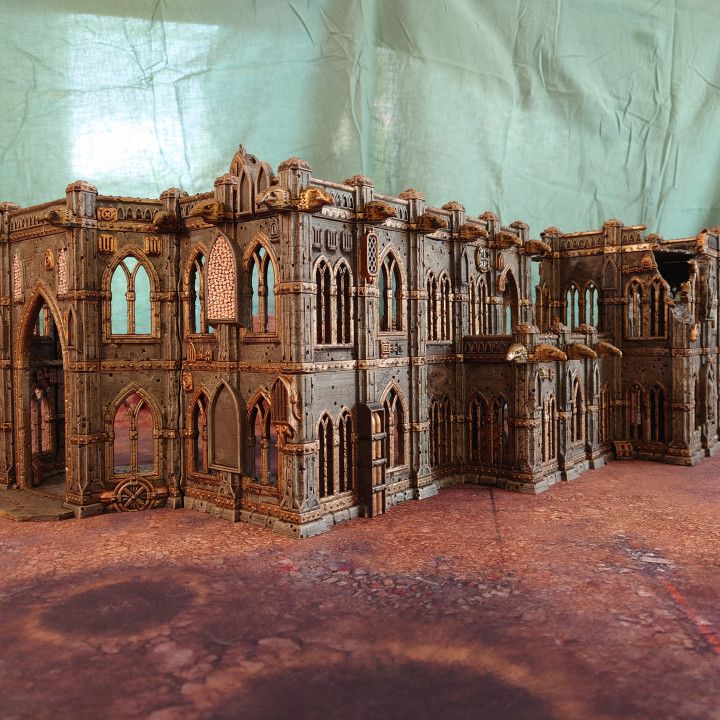
If you look at the featured image at the start of this article you’ll see the high detail and complexity that can be achieved using 3D printers. The model shown will have ideally been printed in different sections to gain size and stability but could also be printed in miniature as a display piece.
To start with though, I’m going to show you a model I’ve found on the popular site, My Mini Factory. If you’re unfamiliar, this type of site is known as a model repository and brings together 3D printable files from many different designers and creators. As a result, there can be a gulf of difference between the quality of some models but you’ll always be able to find something suitable for your needs. The slight downside is that the majority of files need to be paid for but that’s only fair if the designer has put a lot of work into it.
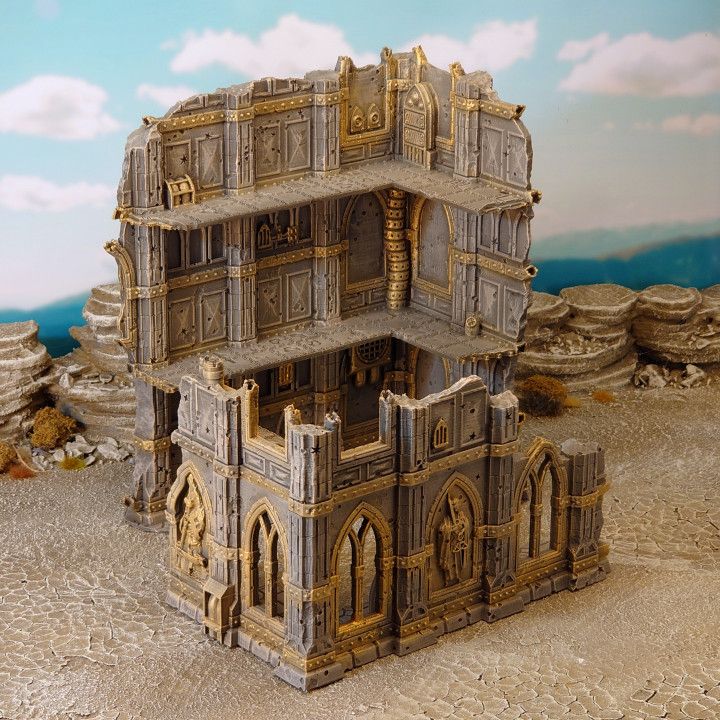
The first one I’m going to show you is this great looking piece from Terrain4Print and is titled “Domina Ferrum”or “Iron Lady” as the English translation. The model is of a church or cathedral like building and, as you can see from the images, has a lot of arched windows and gothic buttresses and gargoyles.
There are 16 different printable parts to the model and as a result, these can be placed in any desired figuration that you want. Therefore, you could assemble a massive centrepiece administration building, a large cathedral or smaller building to use as a village. The added bonus is that parts of the building can be printed in fully intact or ruined form making for even more combinations.
So that’s the description but what about printing it? Well, there are a lot of small details to this model which, as it’s a fairly straight looking building, may seem simple to print. However, to get those straight lines and indeed the curves of the windows and interiors takes some skill and patience.
As each part is printable separately I’d suggest using resin or SLA 3D printing to get the best results. This will limit the scale of the building but shouldn’t impact it too much as you can always print more parts to increase the overall building size.
Using a resin printer will make the definition of the lines and curves much easier but will require correct use of model orientation and supports. With the windows for instance, you need to be using internal supports which don’t touch the build plate. As you probably already know, supports tend to start at the build plate and are then built up to support any overhanging aspects of the model or in this case, the arches. You’ll therefore need to have the bottom of the support on the window ledge to allow it to support the top of the arch.
Another type of support is tree supports which are also useful for supporting parts of the model with overhangs. If you look again at the image of the ruined part of the model, you’ll see it has ledges around the internal walls. These will need supporting but are deliberately designed to look uneven so using tree supports will help with this.
When I’m talking about adding supports etc., I’m of course referring to the process of slicing or preparing your model file to be 3D printed. You may well find that the designer has already thought of this for you and added supports in the right places but this is rarely the case. You therefore need to use a commonly known slicing program like Cura or in the case of Resin printing, Lychee or ChiTuBox which are both equally suitable.
I could go into detail about how to add supports but as each model is different, you’ll need to add them in different areas and configurations. I’m looking though at more complex model shapes so let’s take ChiTuBox as an example slicer so I can show you the best settings to apply to the supports.
So, when printing more complex models, supports are needed on or within the model itself. For instance, on the Domina Ferrum model, these would be the window arches and the overhanging floor platforms. The settings and shapes for these supports will need to be something like these:
Recommended Settings in ChiTubox
|
Contact Shape |
Sphere |
|
Contact Diameter |
0.60 |
|
Contact Depth |
0.20 |
|
Contact Point |
3 |
To explain a bit more as to what these settings mean, I’ll go through each one individually.
Contact Shape: This is the shape added to the upright support at the point it makes contact with the upper part to be supported. In our example model figure, this would be in contact with the top of the window arch or the bottom of the platform.
Contact Diameter: This is the size of the sphere. This would need to be smaller in most cases due to its position within the model. Therefore, it’s recommended at 0.60mm. In a standard support for resin prints top support contact shape diameter would be 0.80mm
Contact Depth: The depth that the contact shape penetrates the point of contact. As this is set to 0.20mm it leaves 0.40mm of the sphere. These are very tiny margins but ensure that the support is securely fixed to the model part.
Contact Point: This determines how many points of contact there should be. In this case, I’ve gone for the maximum of three as this provides a more stable support base. In effect, you’re adding a small tripod to the base of the support.
The key thing is to give your print the best opportunities it can to succeed. This will save you time, costly materials and improve the quality of your prints going forward.
Obviously, the main thing you need to do before you start attempting complex prints is to become fully familiar with the way your printer works and be proficient in producing quality prints on a regular basis. As I always say, remember the five Ps; Proper Preparation Prevents Poor Performance. I sometimes make that the six Ps but I don’t want to swear. I’ll leave you to guess that one!
With terrain or scenery, the principles will be exactly the same and would be dependent on the shape and topography involved. Again, you could use a resin printer for exact detail and finer intricacies but with scenery and terrain, you might not necessarily need as much specific detail. Therefore, I’d suggest using an FDM printer in this case as you can still get those fine details but also get the larger scale that you might need.
Slicer settings as I say will be dependent on the detail and shape but supports will be less prevalent. These would only really be necessary where you have caves or hollows, or where you may have an overhang on a cliff for instance. The slicer I’d always recommend in the case of FDM would be Cura and this has a multitude of detailed settings you can adjust to increase the quality and detail of your print.
Again, I won’t go into detail about the settings but you should be concentrating on infill percentages, wall thickness, layer height and speed. I’d also recommend using PLA as your filament as it’s the easiest to use and work with. Just also make sure that you set the correct bed and nozzle temperatures appropriate for whichever filament you’re using.
So, that’s looked at building, terrain and scenery printing for tabletop games. Let’s now turn our attention to printing more complex Anime themed models.
Complex Anime 3D Prints
When looking at Anime 3D prints, its more than likely that these are going to be figures or character representations of some kind. You could of course still have anime themed buildings and one in particular stands out which I’ll look at later.
In the meantime, I going to look again at a character-based 3D print as in my other articles on the subject. However, I’ve picked this out as having particular design features which might at first glance give you pause to continue.
A word of caution here though if you’re looking online for printable files that you have to pay for. Designers use certain software to create and then produce a 3D render of their model. These can look fantastic and in many cases have been successfully printed and painted both by the designer and previous buyers of the file(s). The cautionary note though relates to designs that are solely 3D renders and show no evidence of having been printed successfully. 3D renders are so good though in some instances that its hard to tell them from an image of a printed model. My tip would be to look at reviews, comments, the number of downloads/purchases and whether any user “makes” have been posted on the model’s page. If I’m honest, I’ve never had an issue with this but as more people realize the potential for selling STLs and other printable files, undesirables may take advantage.
Right, on to the models.
Anime Models
Anime figures tend to either be the basic character in a standing pose or positioned so that hair, clothing fabric and any wings or capes etc. show a degree of movement in the figure. The first of these are usually fairly straightforward to print but it’s the latter that can present complexity issues.
A character that I’ve featured in my article “Dark Anime Themes in 3D Art” is Ryuk from the series “Death Note”. Have a read of that article for a bit more info on the character but he’s basically the Japanese God of death.
3D prints of Ryuk are stunning if they’re done properly as he’s a striking and scary looking character. The complexity comes in the form of the wings, elongated claw like fingers and the general skeletal appearance.
The particular model that I’m going to show you this time is available to buy on Special STL and shows Ryuk in a menacing, sitting pose.
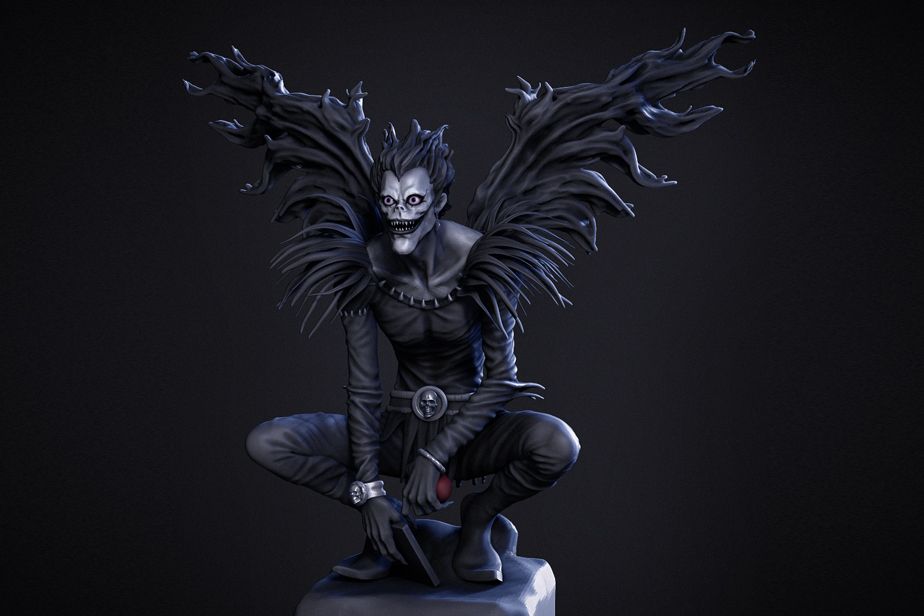
This again would be best served to be printed in resin but handily the files come as separate pieces that you can print and then assemble. They will still need some delicate handling and precision placement of supports though so its not an easy print by any means. If you take a look at the image, the wings and feathers are richly detailed and look very delicate. This is why printing them in resin would work best for these parts and the overall model itself.
Supports will be key here but not quite as tricky as if it were to be printed as a one-piece model. If that were the case then the supports may end up engulfing the model itself and make them difficult to remove.
So there’s just one example of a more detailed figure that you could use your now ever-expanding 3D printing skills.
Let’s now move onto the aforementioned Anime building which doesn’t take much guessing at it being Howl’s Moving Castle.
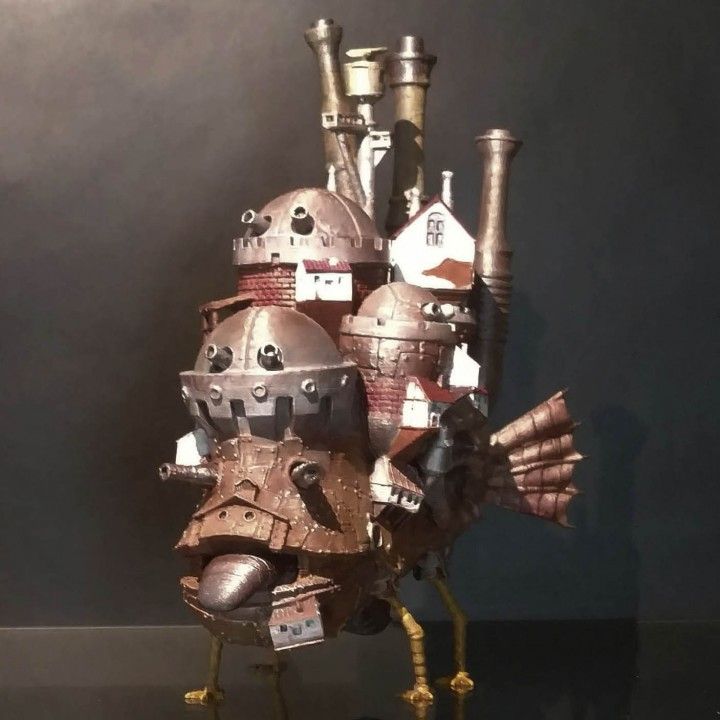
This is a great looking design and model from designer cmag and the files can be found on My Mini Factory.
This may not look like too much of a complicated print but there are some quite technically tricky pieces in there. The model itself is split up into eight separate printable files but you’ll need to print some of these more than once. The designer has stated that they managed to print the entire model without supports, with the exception of the ears.
However, the largest part of the model is the top part which on its own apparently took 44 hours to print. The overall model measures 250mm high so its no small feat to get it printed. Of course you could reduce the scale down if you wanted but why when it would look great on a display shelf in its original size?
The tricky part of this print is the fact that you’ve got a part that does take a very long time to print. Due to the size of the largest part, you’ll need to use an FDM printer which isn’t a bad thing as this is a display piece primarily. The issue comes with ensuring that the print of the large part maintains its quality throughout.
The designer suggests a 0.15mm layer height which is going to give you a better-quality finished product but does go some way to explaining the print time. I would assume and also suggest that the speed is kept fairly low on this to give it the chance to bed each layer in firmly and neatly. A speed of around 30mm/sec would be OK but if you’re prepared to play the waiting game, then reduce it down even more.
You won’t need to constantly monitor the print to ensure the perfect outcome but its worth checking in regularly. This would be best printed with a fully enclosed printer if you can or at least one that has an enclosure added. Any change in ambient temperature can cause imperfections in certain layers. You can almost look at the layers like you would rings on a cut down tree where it can show when external events in the natural world took place. If a draught for instance catches the print mid layer, then you’ll see where the imperfection lies.
Arboriculture aside, this is a great print to get to grips with and although the need for supports isn’t a necessary skill factor in this case, getting the slicer settings just right might take a bit of trial and error. The good thing though is that if you get one of the smaller parts wrong on first attempt, you can print it again with adjusted slicer settings.
So, I’ve only really touched the surface on using your printing skills to their best advantage and giving them a boost. There are many, many projects and files that you can find online which will test your skills and of course there’s nothing to stop you having a go at designing your own.
Whatever you do though, don’t get frustrated if the print doesn’t work perfectly first time. 3D printing is a steep learning curve but when you get to the top, there’s always more you can achieve. After all Rome wasn’t built in a day and apparently neither was Howl’s Moving Castle!
Wave 1 — Kitsune Legends Vol. 1
Wave 1 is live.
Four hand-printed fox-spirits. One sealed box. You don't choose your kitsune — you summon it. Limited run, no restock.
Summon your Kitsune on Etsy →


Member discussion