


Final Fantasy VI has the most generous roster of any mainline Final Fantasy — 14 playable characters, limitless Esper customization, and a story arc that literally ends the world at the halfway point. But generous doesn't mean easy. The second half of the game, the World of Ruin, drops you into a non-linear gauntlet where each major boss can wipe an under-prepared party before you can even assess the situation.
This guide covers the 8–10 fights that actually kill players: the ones with scripted one-shot mechanics, damage-scaling tricks, or Pixel Remaster-exclusive surprises. Each boss gets a party recommendation, Esper loadout, Relic stack, and a "here's what to do if you're under-leveled" fallback. No bug exploits, no Vanish+Doom cheese — the Pixel Remaster patched all of that. Just clean strategies that work.
If you want to see how the characters you'll be using here rank against each other, start with our FF6 Pixel Remaster Tier List. Already know your roster? Read on.
Boss Quick-Reference: Difficulty, Location & Key Mechanic
- Atma Weapon — Floating Continent, World of Balance · Difficulty: ★★★★☆ · Key mechanic: Flare Star scales with HP — low-HP party members take less damage
- Magimaster — Cultists' Tower, World of Ruin · Difficulty: ★★★☆☆ · Key mechanic: Casts Ultima on death — Float makes it miss entirely
- Phunbaba Phase 2 — Mobliz (World of Ruin) · Difficulty: ★★★☆☆ · Key mechanic: Terra fights solo in Trance — no party support
- Doomgaze — Random airship encounter · Difficulty: ★★★★☆ · Key mechanic: Rare spawn, can flee — Ice weakness, drops Bahamut Esper
- Eight Dragons — Scattered World of Ruin dungeons · Difficulty: ★★★☆☆ (per dragon) · Key mechanic: Each has elemental weakness and resistances; killing all eight unlocks Crusader Magicite
- Kaiser Dragon — Soul Shrine (Pixel Remaster exclusive) · Difficulty: ★★★★★ · Key mechanic: Multi-phase endgame superboss — bring your max-level party
- Kefka's Tower Gauntlet — Three-party ascent + Kefka multi-form · Difficulty: ★★★★★ · Key mechanic: Three parties navigate simultaneously — balanced team distribution is everything
Atma Weapon (Ultima Weapon)
Atma Weapon is the Floating Continent's final test before the game's most pivotal story beat. He hits hard with Flare, Meteor, and his signature Flare Star — an attack that deals damage proportional to the HP of whoever it hits. This is the one FF6 boss where running a high-HP party actually works against you.
Party recommendation: Terra (Curaga), Celes (Runic Blade + physical attacks), Sabin (Phantom Rush), Edgar (AutoCrossbow / Drill). Celes absorbs a large portion of his magic via Runic, effectively cutting his output in half.
Espers: Phantom (grants Invisible status which causes most physical attacks to miss — available on Floating Continent) if you can spare the time, or just pump Sabin's Strength stat bonuses via Bismarck or Stray at level-up. Don't over-invest in HP for this fight.
Relics: Force Shield (+50% Magic Defense) on your primary healer. Hyper Wrist on Sabin for Attack boost. Gale Hairpin (Haste on entry) if you have it.
Opening turns: Celes → Runic (absorbs all spells until her next command). Edgar → Drill or Flash (high damage, ignores Defense). Terra → Haste or Bio if you have it. Sabin → Phantom Rush every turn.
Under-leveled fallback: Stack Force Shield on everyone, lead with Runic on Celes every other turn. Keep your weakest HP characters in the back row. Grind 2–3 levels on the Floating Continent if you're wiping — the enemies there give solid AP and Gil.
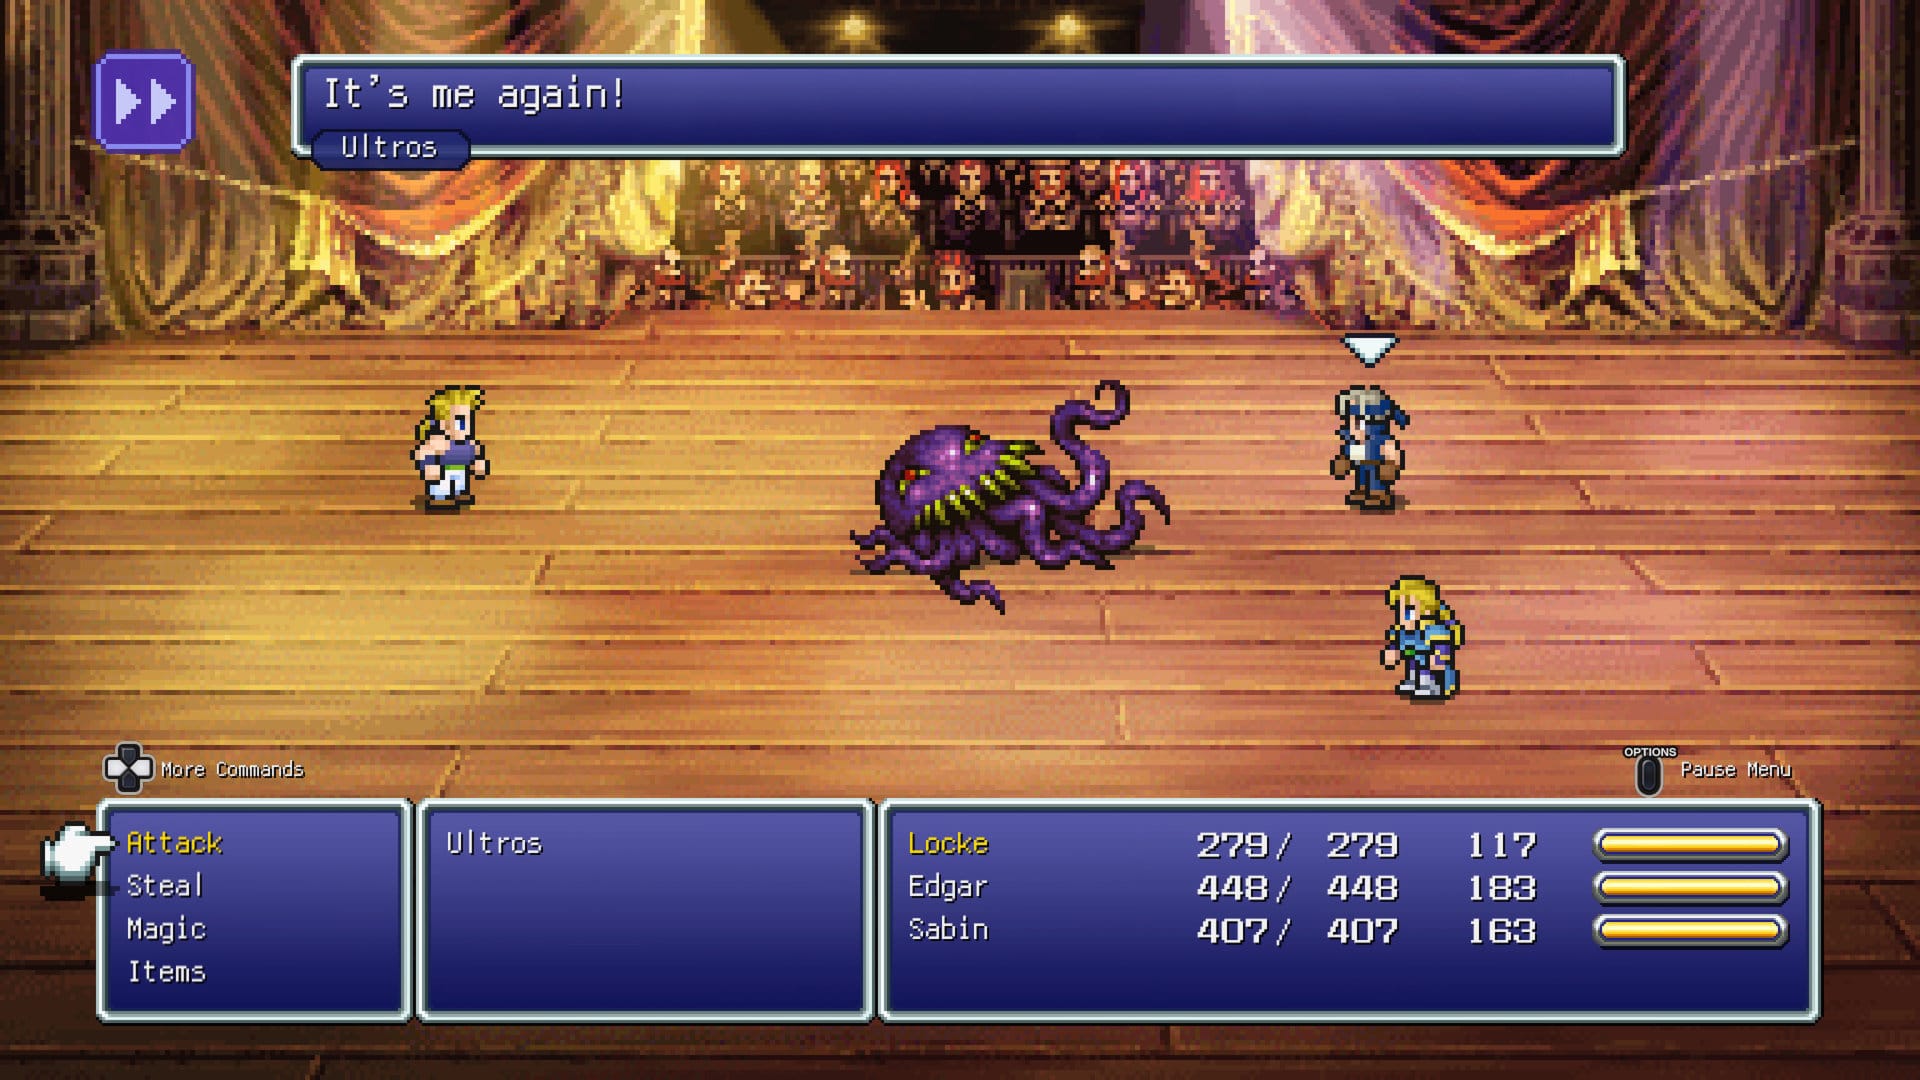
Magimaster
Magimaster in the Cultists' Tower is the most infamous "gotcha" boss in FF6 — and one of the most satisfying to solve once you know the trick. His gimmick: when his HP hits zero, he casts Ultima on the entire party. That Ultima hits for ~5,000+ damage and will one-shot anyone without a defensive buffer.
The counter: Float status makes Ultima miss. Ultima is classified as an Earth/ground-level attack in FF6's engine. Floating targets are immune. Get Float on your entire party before his HP drops to zero and Ultima flies harmlessly beneath everyone's feet.
Party recommendation: Strago (knows the Float Lore from earlier in the game), two physical fighters with high Attack, one healer. If Strago doesn't have Float, use the Float Esper (Palidor grants Float at summon — keep the Esper equipped even if not casting).
Espers: Palidor for Float. If you don't have Palidor and Strago doesn't know Float, use the spell from the party's repertoire — Celes can sometimes cast it if she's absorbed it via Runic earlier. Have a backup plan.
Also important: Magimaster cycles through elemental absorptions — he'll absorb whatever element he was last hit with on his shield. Use physical attacks when he's absorbing magic, and vice versa. AutoCrossbow and Sabin's Phantom Rush ignore his elemental cycling entirely.
Relics: Muscle Belt for HP buffer (the tower is a long slog to reach him). Safety Bit prevents KO from Ultima if Float fails for any reason.
Under-leveled fallback: If you can't sustain Float on the whole party, Safety Bit on everyone and accept a Ultima wipe but survive with the auto-revive from Phoenix Magicite if equipped.
Phunbaba — Phase 2 (Mobliz)
When you return to Mobliz in the World of Ruin, you trigger the second Phunbaba encounter — and this one is unique. Terra refuses to let the party fight with her and enters the battle alone in Trance form. No party support. Just Terra and whatever Esper + Relic loadout she's carrying.
Party recommendation: Terra solo. Non-negotiable. Make sure Terra has been leveling with the right Espers before this fight — this is the biggest argument for not neglecting her Esper stat bonuses early in the WoR.
Espers for Terra's stat bonuses: Bismarck (+2 Strength per level), Stray/Moguo (+1 Magic per level if you prefer spell damage), or Shiva for Magic boosts. By Mobliz revisit, Terra should have at least a dozen level-ups under her belt — those bonuses compound significantly.
Relics for Terra: Muscle Belt (max HP buffer for Meteor hits), Safety Bit (prevents instant death from his stronger attacks), Running Shoes (Haste auto). If Terra has access to a second Relic slot: Hyper Wrist for Attack boost on her Trance strikes.
Opening strategy: Use Curaga immediately if Terra takes early damage — Phunbaba hits hard but isn't as fast as Atma Weapon. In Trance, Terra's Morph (Trance) form doubles her Magic stat, so Fire and Fire-based spells hit harder than any physical option. Spam Fira or Firaga in Trance.
Under-leveled fallback: If Terra is under-leveled and this fight feels impossible, skip Mobliz and come back later. Phunbaba is optional — you don't need to beat him immediately. Level Terra elsewhere first.
Doomgaze — The Airship Hunt
Doomgaze is the rarest World of Ruin encounter — he's a random airship encounter with a very low spawn rate. If you're not actively hunting him, you might finish the entire game without seeing him. He matters because he drops the Bahamut Magicite, which teaches Flare and Meteor and gives a +50% MP bonus at level-up. Worth tracking down.
How to find him: Save before entering the airship, then trigger random encounters by flying slowly over large landmasses. He appears as a shadow on the world map when he spawns. He can flee the battle, so you need to act fast.
Party recommendation: Characters who can hit hard on turn 1. Doomgaze is weak to Ice — Celes (Blizzaga), Mog (Ice Rod + Dance), Terra (Blizzaga), Edgar (Flash hits his weakness if you don't have Blizzaga unlocked yet).
Espers: Tritoch (teaches Blizzaga to whoever doesn't know it) equipped on anyone who needs the spell. Carbuncle can bounce magic back at Doomgaze — hit him with Ice he bounced off your reflected party for a damage loop.
Relics: Quick Shoes (Haste auto) to get extra turns before he can flee. Earring or Gold Hairpin to amplify magic damage.
Opening turns: Fast physical attacks or Blizzaga immediately — do not let him act if you can avoid it. He flees when his HP drops below a threshold, so sustained early burst wins the fight.
The Eight Dragons
The Eight Dragons are a world-spanning boss hunt — one dragon hidden in each of eight World of Ruin dungeons. They're not required to complete the game, but killing all eight unlocks the Crusader Magicite, which teaches Meltdown and Meteor and grants the Ultima spell via summon. Worth the effort if you're going for the endgame power ceiling.
Each dragon has a unique elemental profile. The short version:
- Storm Dragon (Mt. Zozo) — Weak to Wind/Lightning, use Sabin's Air Blade or Thunder magic
- Ice Dragon (Narshe) — Weak to Fire, use Edgar's Flash or Terra's Firaga
- Earth Dragon (Opera House ruins) — Can be hit with Quake since it's not airborne (it's the only dragon vulnerable to ground-based Earth attacks)
- Skull Dragon (Kefka's Tower) — Zombie and status effects, use Holy Water and Phoenix Esper
- Gold Dragon (Kefka's Tower) — High Defense, magic-based attacks recommended
- Blue Dragon (Ancient Castle) — Weak to Lightning, magic-focused
- Red Dragon (Phoenix Cave) — Weak to Ice, physical-resistant
- White Dragon (Ancient Castle) — Absorbs Holy, use non-elemental or status
General Dragon strategy: Keep a healer active, use elemental weakness once identified, and maintain Shell against each dragon's preferred magic type. The dragons in Kefka's Tower require you to have three balanced parties — plan your roster split before entering.
Kaiser Dragon — Pixel Remaster Exclusive
Kaiser Dragon is the Pixel Remaster's answer to a major SNES-era cut — this boss was originally planned for the original release but was cut. The Pixel Remaster finally delivers him in the Soul Shrine, which unlocks after defeating all Eight Dragons. He is the hardest fight in the entire game.
Kaiser Dragon is a multi-phase fight with a massive HP pool, elemental cycling, and the ability to cast Ultima and Meltdown in succession. This is not a fight to attempt without maxing out your equipment.
Party requirement: Four Level 60+ characters with max-tier Esper stat bonuses. Terra and Celes should both know Ultima. Sabin should have his Strength maxed via Bismarck bonuses (Phantom Rush will be your main physical damage source). Edgar provides disruption via Flash and Tools.
Espers: Economizer (halves MP cost — Terra casting Ultima for reduced MP is the core DPS engine) on Terra. Phoenix on your primary healer for auto-revive backup. Palidor for Float (nullifies his Meltdown and Quake-based attacks). Golem for physical damage mitigation.
Relics: Economizer on Terra (essential — frees MP for sustained Ultima spam). Master's Scroll on Sabin (4x Phantom Rush per turn at max Attack = massive damage). Safety Bit on the healer to prevent instant death from Ultima. Force Shield on the most vulnerable party member.
Strategy: Open with Hastega, cast Float on the whole party (negates half his toolkit), then cycle: Terra casts Ultima every turn, Sabin uses 4x Phantom Rush via Master's Scroll, Celes alternates Ultima and Runic (Runic absorbs his magic turns), healer maintains HP above 3,000 for everyone at all times.
Under-leveled fallback: There isn't one. If you're struggling here, you haven't farmed enough Esper stat bonuses. Come back after an additional 10–15 levels on the Soul Shrine's regular enemies, focus on Strength (Bismarck) for Sabin and Magic (Stray) for Terra/Celes at each level-up.
Kefka's Tower: The Three-Party Gauntlet & Final Boss
Kefka's Tower is FF6's final dungeon — and it's designed unlike anything else in the game. You split your full roster across three parties and navigate three parallel paths through the tower simultaneously. Each party encounters different bosses and traps before converging for the final sequence.
Party distribution: Don't stack your best characters on one team. Distribute your healing capability across all three (each team needs at least one character who can cast Curaga). Suggested splits: Team 1 (physical DPS + healer) → Sabin, Edgar, Locke, Terra. Team 2 (balanced) → Celes, Strago, Shadow, Setzer. Team 3 (magic-heavy) → Relm, Mog, Gau, Cyan. Adjust based on who you've leveled.
Pre-boss gauntlet: You'll fight a series of bosses in each path including Inferno (with Rough and Striker), Poltergeist, and Magimaster (a second time — same Float strategy from the Cultists' Tower applies). Make sure every team has Float coverage.
Kefka's final form sequence: Kefka is a multi-stage fight. The first phase involves divine forms (the Warring Triad imagery — dealing enough burst damage in short windows prevents their most powerful counterattacks). The final Kefka form is a sustained fight where he cycles through his most powerful attacks including Havoc Wing and Forsaken (hits the whole party for massive damage).
Espers for the final push: Phoenix on all three teams (auto-revive from Raise on death prevents wipes). Odin for instant Kill attempts on the earlier forms. Crusader for Meltdown spam if you've collected all Eight Dragons. Economizer on Terra or Celes for sustained Ultima output.
Relics: Safety Bit on healers (Forsaken can one-shot). Earring/Gold Hairpin on your magic users to amplify Ultima damage. Running Shoes (Haste auto) on your primary DPS characters.
Opening Kefka final phase: Hastega immediately. Then Phoenix summon for Reraise on everyone. Rotate: Terra → Ultima, Sabin → Phantom Rush x4, Celes → Runic or Ultima, healer → Curaga as needed. Burst the final form down as quickly as possible — he gets more dangerous the longer the fight runs.
The ending is worth it. One of the best in RPG history.
General Pre-Fight Checklist (Apply to Every Boss)
- Shell and Safe: Reduce magic and physical damage by 33%. Available from Esper summon or the spells learned via Crusader/Alexandr Magicite.
- Float: Negates Earth/ground attacks (Quake, Meltdown, Ultima from Magimaster). Palidor Magicite is the most reliable source.
- Haste: More turns = more healing = more damage. Run Shoes Relic or the Haste spell on your fastest character first turn.
- Phoenix equipped: If a character dies and you have Phoenix Magicite set, they auto-revive once. This safety net prevents wipes on surprise one-shots.
- Back row for non-physical characters: Row doesn't affect magic damage but halves physical damage taken and dealt. Put Terra, Celes, Strago, and Relm in the back row by default.
For a deeper look at which characters to bring into these fights and how to build each one for max effectiveness, see the FF6 Character Tier List. If you're enjoying these deep-dive JRPG guides, check out our Best JRPGs of All Time — FF6 ranks near the top for a reason. And if you're looking for a modern spiritual successor with a similarly layered combat system, our Sea of Stars hub has full boss strategies for that game too.
Replaying on PC or Steam Deck? FF6 Pixel Remaster (Steam key) — instant delivery.
Wave 1 — Kitsune Legends Vol. 1
Wave 1 is live.
Four hand-printed fox-spirits. One sealed box. You don't choose your kitsune — you summon it. Limited run, no restock.
Summon your Kitsune on Etsy →


Member discussion